VARIATIONS: 1) Tie only part of the circle. 2) Tie at one inch intervals. 3) Poke the center or tip down inside the rest of the circle before tying.
Tie Dye Instructions
from http://www.prochemical.com/directions/Folding.htm
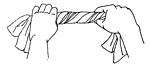
| KNOT TYING | |
|
|
Hold the cloth at both ends and twist into a long rope form |
|
|
Tie this long rope into a knot and tighten as much as you can without damaging the cloth. Knot tying works best on long sleeves and light-weight material. You can tie as many knots as you have room for. Rubber bands or string can be tied over the knots to reinforce them as well as provide fine lines in the pattern. |
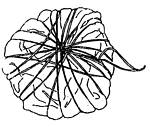
| SPIRALS | |
|
|
Lay your material on a flat surface. Place your thumb and a couple of fingers together on the cloth at the point which will be the center of the design. Using the weight of your fingers to hold the cloth in place, start twisting. After each twist, flatten the material with the palm of your hand to keep the folds from rising. With your other hand, bring the loose ends into the circle and continue to twist until the whole thing looks like a fat pancake. |
|
|
Now take rubber bands, and without disturbing the shape of the pancake slide the bands under the cloth so that they intersect at the center. Use as many as necessary to retain the circular shape, about twice the number shown in the illustration at right for most tie-dyes. If you decide to immerse, instead of squirting, just set the cloth gently in the dye bath, do not stir. For an interesting effect, prevent the cloth from submerging, either by using less water or by placing the cloth on a prop to hold it out of the dye a little. Some materials will float automatically. Then sprinkle a different color dye in powder form over the top of the cloth, being careful not to get any in the other dye solution. |
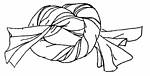
| ELECTRIC BUNCHING | |
|
|
Gather cloth together in small bunches until it is shaped like a ball. Try to expose as much of the cloth to the surface as possible. This effect works best on thin materials. |
|
|
Wrap the string or rubber bands loosely around the ball in as many directions necessary to retain the ball shape, and set gently in the dye bath. Do not stir. Just turn over once in a while. |
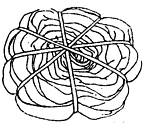
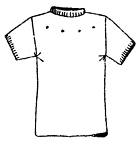
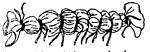
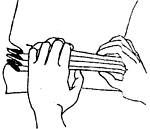
| ROSETTES | |
|
|
A Rosette is many little circles, touching or overlapping each other. Using a pencil or your mind's eye, make a few dots on the cloth in any pattern. Each dot will be the center of a small circle. |
|
|
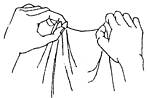
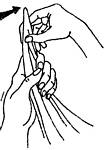
With the thumb and forefinger pick up dot after dot and transfer to the other hand. |
|
|
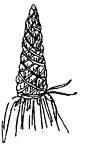
Wrap string or rubber bands several times around the base of all the circles which have been gathered together. Continue to wrap to the tip and back, making sure your ties are very tight. |
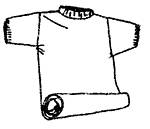
| STRIPES | |
|
|
Roll the cloth very loosely, forming a long tube. The stripes will be at right angles to the tube. |
|
|
Tie at one intervals or as far apart as you want the stripes to run. Loop rubber bands or wrap string around the tube a few times and knot. Make sure the ties are very tight. Now you can either immerse or squirt the dye on, alternating your colors, |
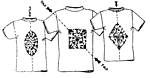
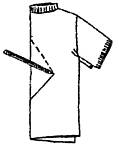
| DIAMONDS OVALS SQUARES | |
|
|
Fold the cloth once along an imaginary line which will run through the intended form. See possibilities below. Try hearts too. |
|
|
Draw half of the intended design with a pencil or with your mind's eye, starting and ending on the crease. |
|
|
Form pleats, starting at one end of your line. Try to keep that line in the center between your hands while pleating until you come to the end of your line. |
|
|
Wrap string or rubber bands around all the gathered pleats several times, and tie a secure knot. Now you can continue wrapping to the tip and back, or tie an Electric Ball or anything else you can think of. |
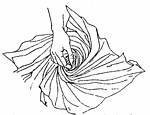
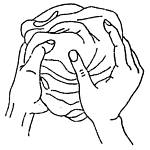
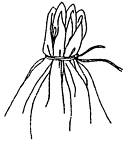
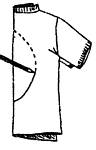
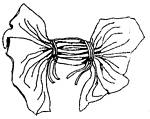
| CIRCLES | |
|
|
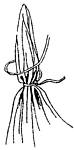
The circle design is relatively simple to create, yet it is easily one of the most dramatic. Just pick up the cloth with thumb and forefinger at the point you choose to be the center of the circle. |
|
|
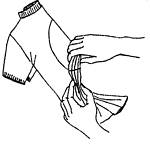
With the other hand, try to arrange fairly neat and evenly spaced pleats around the central axis like a closed umbrella. Smooth the cloth down, and hold tightly at the base. Now let go of the top. |
|
|
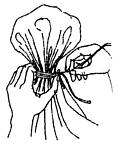
With string or rubber bands, tie a strong
anchor-knot around the base. Continue wrapping to the tip and back again and secure at the
base. Make sure the ties are very tight. VARIATIONS: 1) Tie only part of the circle. 2) Tie at one inch intervals. 3) Poke the center or tip down inside the rest of the circle before tying. |
| PLEATS | |
|
|
Lay cloth on flat surface. Place thumbs of both hands together firmly on the cloth. Position fingers about an inch or two in front of your thumbs, and pinch the fabric to raise a fold. Continue to pinch up more pleats until you reach the end of the cloth. You can change directions as often as you want by gathering more material in one hand than in the other. |
|
|
Be careful not to lose any pleats. Loop rubber bands or string very tightly around all the pleats several times and knot. You can use as many ties as you want. This useful technique is also employed in tying ovals, squares, diamonds or any shape you can imagine which has symmetry. |
Color Mixing
You can make all the colors you need by mixing lemon yellow, fuchsia, and turquoise. Add black, for contrast, and it's hard to mix yourself.
Simple rules:
| a lot of fuchsia and a little yellow make red | |
| red and yellow make orange | |
| yellow and turquoise* make green | |
| a lot of turquoise* plus a little fuchsia makes blue | |
| turquoise* plus fuchsia makes purple *(remember to double the amounts of turquoise as compared to other colors) |
Color Choice
The two most obvious differences between a wonderful tie-dye and a so-so one are color choice and color saturation. You'll find that you really have to work to squirt enough dye into the folds to avoid a large amount of white on the finished garment. In choosing colors to place adjacent to each other, remember the color wheel. Do not place "opposite" colors next to each other, such as red near green, or blue near orange, or yellow near purple: the results would be a muddy mess. If you really like bright colors, as I do, avoid placing a color with red mixed *in* it, such as purple, near green.
A good basic rule is to apply two colors next to each other only if they appear next to each other in the following short list:
fuchsia...yellow...turquoise...purple...fuschia
...or, for a more detailed color scheme, choose adjacent colors from the following expanded list:
fuchsia...red...orange...yellow...green...turquoise...blue...purple...fuschia
It really does help to place fuchsia between red and purple.